
Tip of the Month
Dynamics 365 Business Central Tip of the Month: Speed up data entry with default G/L account quantities
Entering sales and purchase documents in Dynamics 365 Business Central often involves repetitive data entry. When adding general ledger (G/L) account lines, users may need to enter a quantity of 1 for each line, even when the transaction does not require a different quantity. Across multiple documents, these extra steps can add unnecessary work to routine accounting tasks.
Business Central’s Default G/L Account Quantity setting provides a simple way to streamline this process. By automatically populating a quantity of 1 on new G/L account lines, users can reduce repetitive entry while retaining the flexibility to adjust quantities when needed.
Tip summary: Automatically populate quantities for G/L account lines
The Default G/L Account Quantity setting allows Business Central to automatically enter a quantity of 1 when users add G/L Account lines to sales and purchase documents.
This setting is available in both Sales & Receivables Setup and Purchases & Payables Setup, allowing organizations to configure the behavior for their sales and purchasing processes independently.
When enabled, the setting helps users:
- Reduce repetitive data entry: Automatically populate a quantity of 1 instead of entering it manually on each applicable line.
- Speed up document creation: Eliminate an extra step when entering sales and purchase documents with G/L account lines.
- Maintain flexibility: Override the default quantity when a transaction requires a different value.
- Improve consistency: Establish a standard starting quantity for G/L account lines across applicable documents.
The setting applies specifically to document lines with a Type of G/L Account, rather than all item, resource, or other document line types.
Tip steps: How to set a default quantity of 1 for G/L account lines
Step 1: Open Sales & Receivables Setup
- Select Search in Business Central.
- Enter Sales & Receivables Setup.
- Select the related page.
This page contains settings that control how sales documents are created and processed in Business Central.
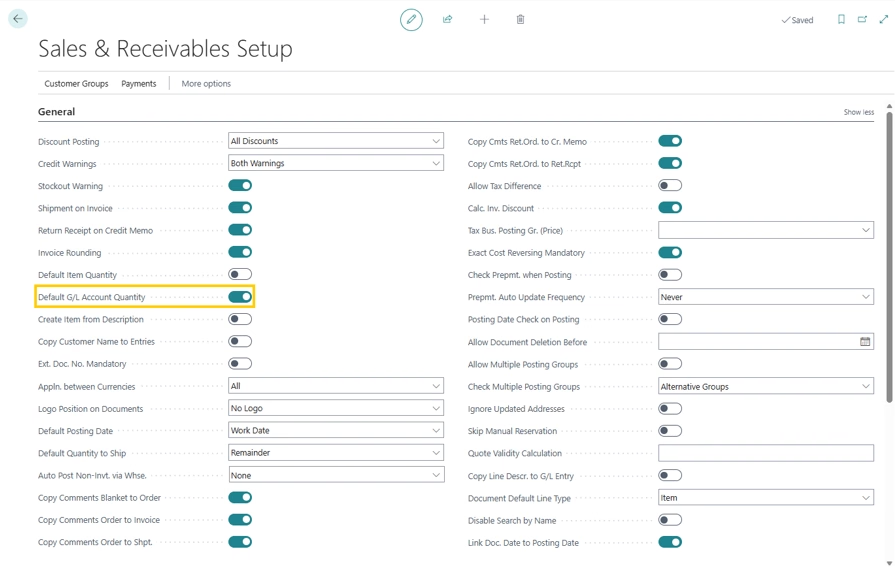
Step 2: Enable Default G/L Account Quantity
On the Sales & Receivables Setup page, locate the Default G/L Account Quantity setting and turn it on.
Once enabled, Business Central will automatically populate a quantity of 1 when users add new G/L Account lines to applicable sales documents.
Step 3: Configure the setting for purchase documents
The same functionality is available for purchase documents.
- Use Search to open Purchases & Payables Setup.
- Locate the Default G/L Account Quantity setting.
- Turn on the setting.
With this option enabled, new G/L Account lines on applicable purchase documents will also default to a quantity of 1.
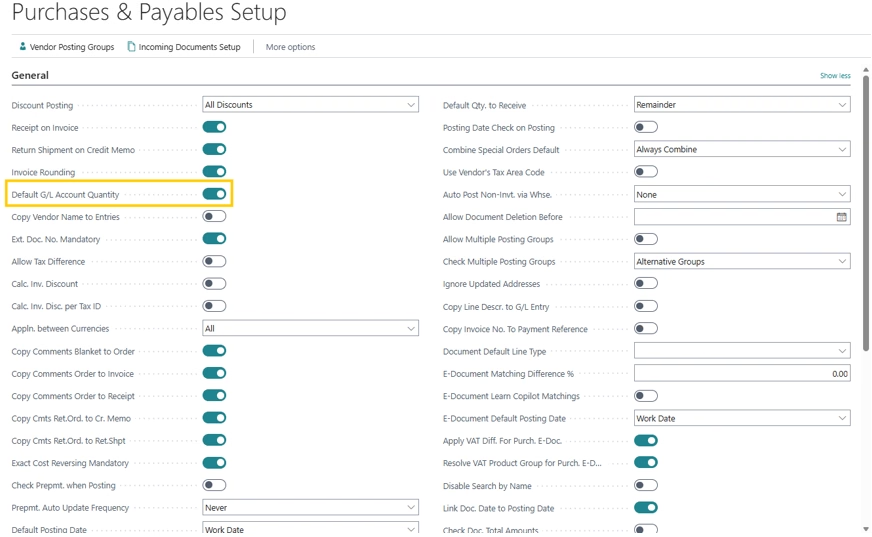
Step 4: Create a document and verify the default quantity
After enabling the setting, test it by creating a sales or purchase document.
- Create a new sales or purchase document.
- Add a document line and select G/L Account in the Type field.
- Select the appropriate general ledger account.
- Verify that Business Central automatically populates the Quantity field with 1.
- If necessary, change the quantity to reflect the transaction.
The default quantity helps reduce manual entry but does not prevent users from entering a different quantity when needed.
Why this tip matters
The Default G/L Account Quantity setting is a small configuration change that can make everyday document entry more efficient. By automatically populating quantities on G/L account lines, finance teams can eliminate repetitive steps, improve consistency, and spend less time on routine transactions.
Looking for help configuring Business Central settings or finding other ways to streamline your accounting processes? Rand Group’s Business Central experts can help you optimize your system to support your business needs. Contact us today to learn more, and return next month for another Business Central Tip of the Month.

More Tips of the Month

Dynamics 365 Business Central Tip of the Month: Preserve line-level detail in G/L entries
Read MoreDynamics 365 Business Central Tip of the Month: Preserve document history with automatic archiving
Read More