Tip of the Month
Sage 100 Tip of the Month: Set up ACH payments for AP vendors
Paying vendors electronically can help Accounts Payable teams reduce paper checks, streamline payment processing, and provide vendors with more convenient payment options. Sage 100 supports ACH electronic payments, but there are a few important configuration steps to complete before you can start generating ACH files.
This month’s Sage 100 Tip of the Month walks through the three main parts of the process: enabling ACH and configuring your vendors, setting up your bank information, and processing your first electronic payment.
Tip summary: Configure ACH payments in Sage 100
Setting up ACH vendor payments in Sage 100 requires configuring ACH electronic payment options, individual vendors, and your bank’s ACH information. Once the setup is complete, Sage 100 can process electronic vendor payments, generate remittance advice, and create the ACH file you transmit to your bank.
Because ACH requirements can vary by financial institution, work with your bank to confirm the information and file requirements needed for your specific account before going live.
Tip steps: How to set up ACH payments in Sage 100
Step 1: Enable ACH electronic payments
Navigate to:
Modules > Accounts Payable > Setup > Accounts Payable Options > ACH
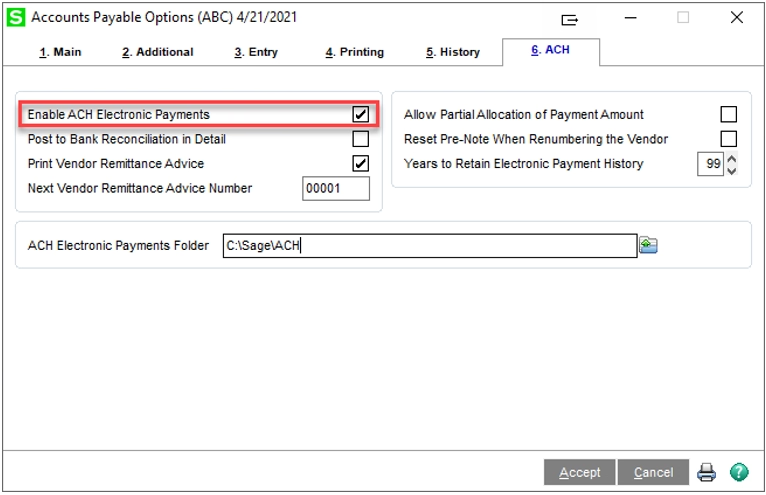
Then:
- Select Enable ACH Electronic Payments.
- Set the number of years you want to retain electronic payment history.
- Enter a ACH Electronic Payments Folder.
Use a common UNC path that can be accessed the same way from every Sage 100 workstation rather than a local file path.
Review the remaining ACH options, make any necessary changes, and click Accept.
Step 2: Configure the vendor for electronic payments
Navigate to:
Modules > Accounts Payable > Main > Vendor Maintenance
Select the vendor you want to pay through ACH and:
- Select Electronic Payment.
- Enter the appropriate Standard Entry Class:
- PPD – Prearranged Payment and Deposit
- CCD – Cash Concentration or Disbursement
- CTX – Corporate Trade Exchange

3. Click More > Electronic Payment.

4. Enter the vendor’s:
- Bank account number
- Routing/transit number
- Bank account type
- Bank account description
- Distribution method and applicable percentage or amount
5. Configure the Pre-Note Sent status based on your bank’s requirements.
6. Click Accept.
If your vendor uses multiple ACH accounts, remember that Sage 100 allocates payments from the top of the list downward, fulfilling the first account before moving to the next.
Step 3: Configure ACH Maintenance
Next, navigate to:
Modules > Setup > ACH Maintenance
Select the appropriate Bank Code.
If you are ready to use the bank code for ACH payments, select Pre-Note Approved. If you are configuring the information in advance but are not ready to go live, leave it unchecked.

Enter the ACH information provided by your bank, which may include:
- Immediate Destination number and description
- Immediate Origin number and description
- Originating DFI
Then review the Records and Additional tabs and complete the information required by your bank. Requirements can vary by financial institution, so confirm your specific ACH specifications before completing the setup.
Click Accept when finished.
How to pay a vendor using ACH
Once ACH and the vendor are configured, Sage 100 will recognize the vendor for electronic payment during Check and Electronic Payment Processing.
Complete the normal payment selection process, then:
- Process and print the vendor’s Remittance Advice. You can print, create a PDF, or electronically deliver remittance advice using Paperless Office.
- Update the Check and Electronic Payment Register.
- Navigate to Accounts Payable > Check Printing and Electronic Payment > Generate ACH File.
- Select the batch or transactions you want to transmit. You can also use Only Batches Never Transmitted to capture pending ACH transactions.
- Click Proceed.
Sage 100 will create an .ACH file in the electronic payments folder configured during setup. Submit that file to your bank according to your financial institution’s required transmission process.
Why this tip matters
Moving vendor payments from paper checks to ACH can reduce manual processing, simplify payment delivery, and help Accounts Payable teams operate more efficiently. Proper setup is critical, however, because ACH file specifications and banking requirements can vary.
If you need help configuring ACH payments, validating your setup, or finding other ways to optimize Accounts Payable in Sage 100, our Sage 100 experts are here to help. Contact our team for help configuring or optimizing ACH payments in Sage 100, and return next month for another Sage 100 Tip of the Month.