Dynamics 365
 Power Platform
 Dynamics
Moving an inventory item to Fixed Assets in D365 Finance and Operations

For businesses that sell and rent the same items, managing inventory and fixed assets efficiently is more than just a best practice—it’s a necessity. Properly reclassifying inventory items as fixed assets is a critical step in ensuring accurate financial reporting, maintaining compliance, and gaining a clear understanding of your business’s financial health. This guide walks you through the process in D365 Finance & Operations step by step, ensuring you can confidently manage your inventory and fixed assets with ease. From navigating the Fixed Asset module to posting journals and verifying transactions, we’ll cover everything you need to know to execute this process smoothly.
Why does moving inventory items to fixed assets matter?
Moving inventory items to fixed assets in Microsoft Dynamics 365 Finance and Operations is crucial for accurate financial reporting and asset management. This process ensures that items initially classified as inventory, but later intended for long-term use within the organization, are properly accounted for as fixed assets. By doing so, businesses can track depreciation, allocate costs over the asset’s useful life, and comply with accounting standards. It also enhances visibility into asset utilization and value, supporting better decision-making and financial planning. Managing this transition effectively helps maintain data integrity and ensures compliance with regulatory and internal policies.

Empower your team with expert training
Empower your team with the expertise they need to excel. Rand Group delivers tailored training services to help your employees unlock the full potential of Dynamics 365 Finance and Operations. From onboarding new users to enhancing your team’s skills, our specialists offer practical, hands-on support to drive your organization’s success.
How to move an inventory item to Fixed Assets
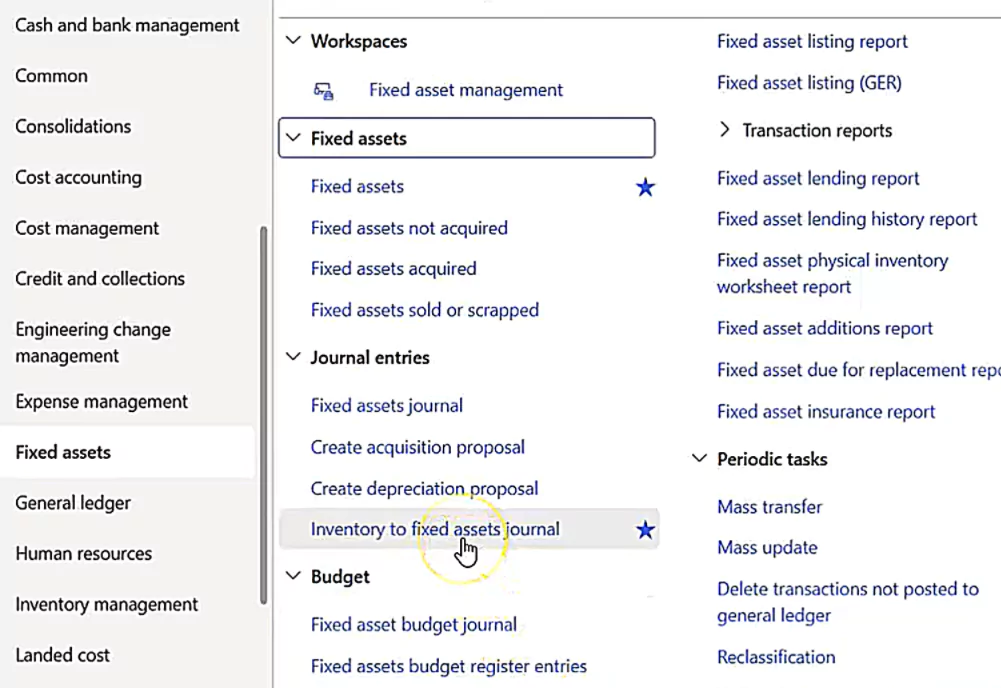
Step 1: Navigate to the Fixed Asset module
- Open D365 and click on Modules
- Select the Fixed Assets module to open the fixed assets menu
- Locate the Inventory to Fixed Asset Journal*
* Tip: You can save this journal as a favorite for quicker access or use the search bar to find it.
Step 2: Open or Create a Journal
Click on the Inventory to Fixed Asset Journal
You can either:
- Use an existing journal, or
- Create a new journal by clicking the New button

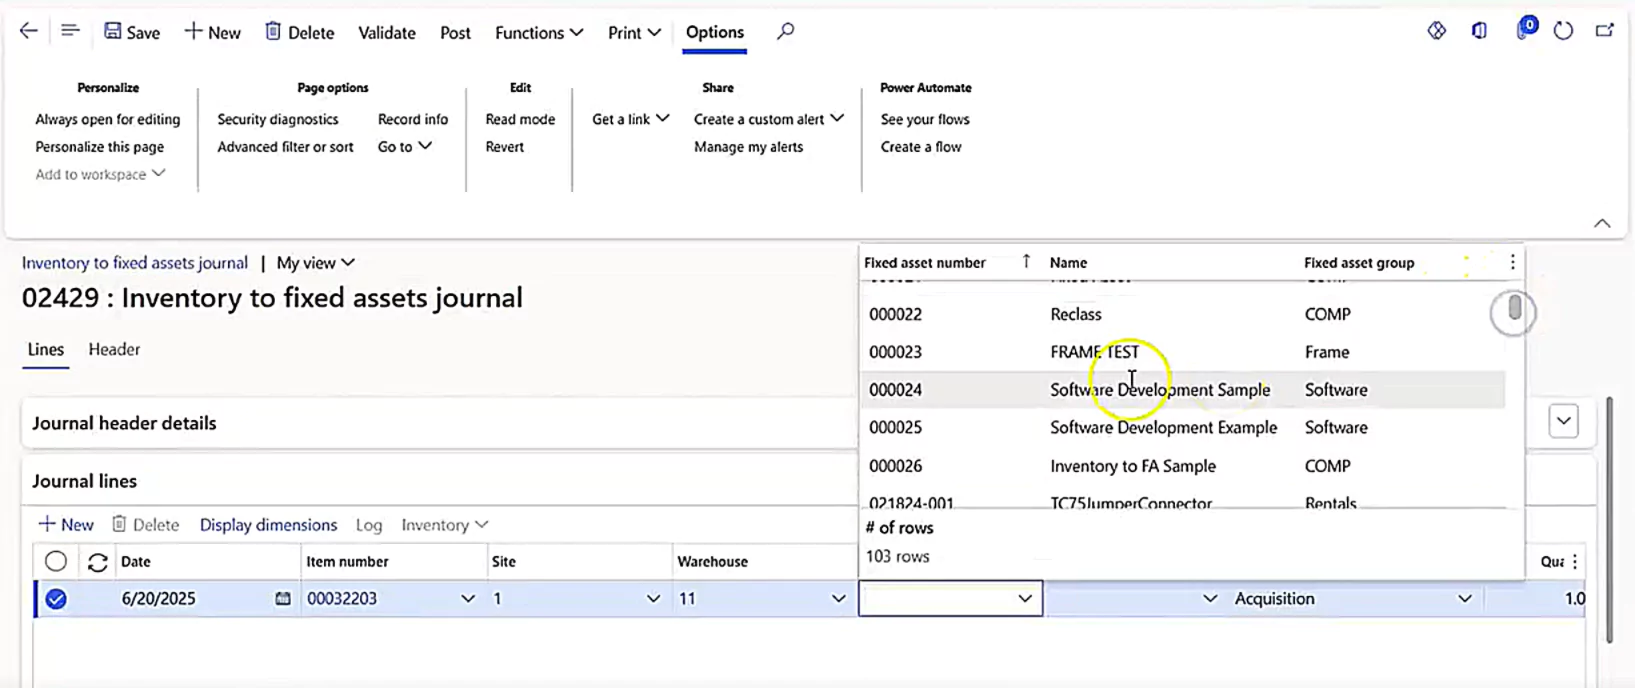
Step 3: Enter transaction details
- Select the transaction date: Accept the default date or choose a specific date for the transaction
- Choose the inventory item: Select the item you want to move from inventory to fixed assets
- Specify the site and warehouse:
- Ensure you select the correct site and warehouse where the inventory item is stored
- There must be sufficient quantity available in the selected location
Step 4: Assign the fixed asset
- Select the fixed asset:
- Type the asset name or select it from the dropdown menu
- For example, if you created “Asset 26” for this purpose, select it
- Review depreciation book:
- The system will default to the depreciation book set up for the fixed asset
- You can override this if necessary
- Set the transaction type and quantity:
- The transaction type will default to Acquisition
- The quantity will default to 1, but you can adjust it if you move multiple items
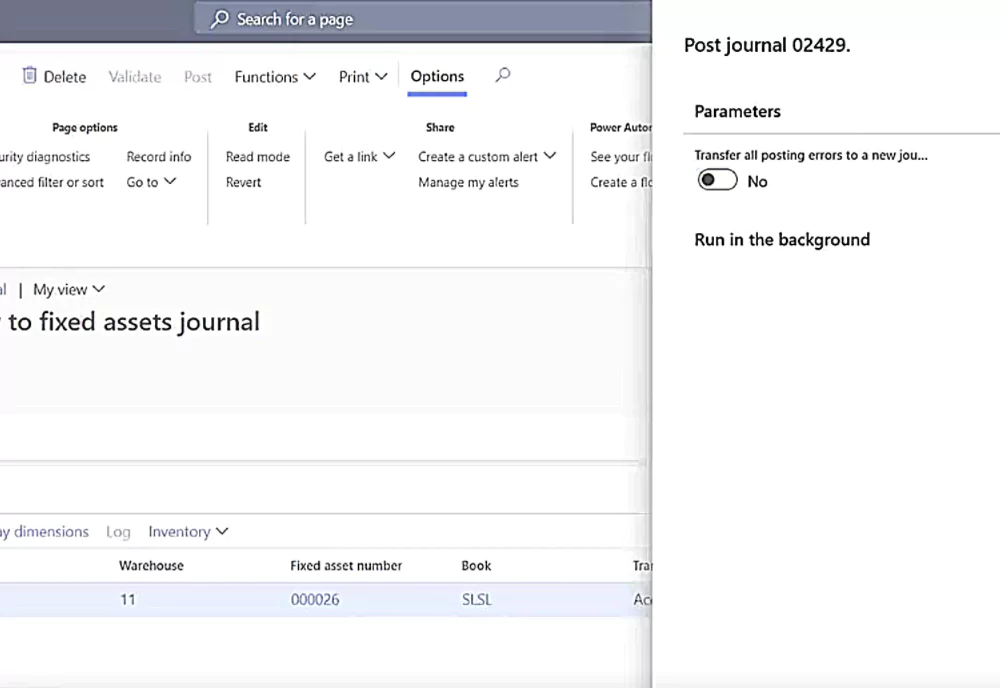
Step 5: Post the journal
- Click Post to finalize the transaction
- A confirmation screen will appear, allowing you to run the process in the background if needed
- Once posted, you’ll receive a notification confirming the journal has been successfully posted
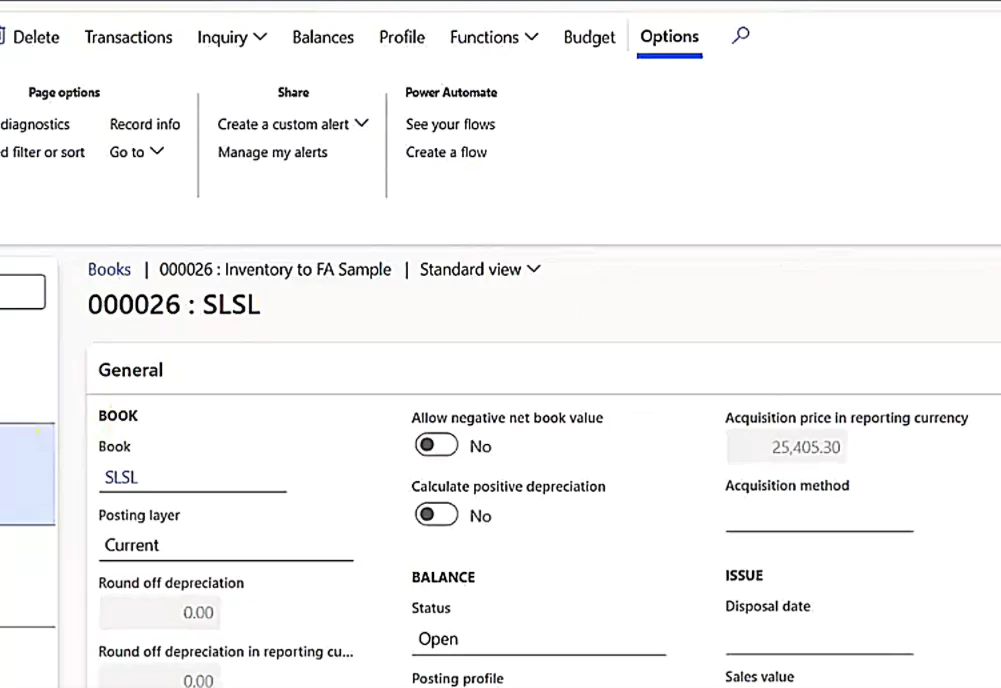
Step 6: Verify the fixed asset
- Return to the Fixed Assets module
- Locate the specific fixed asset (e.g., “Asset 26”) by scrolling, filtering, or searching
- Open the asset card and navigate to the Books menu
- Select the relevant book (e.g., “SLSL Book”) to view the acquisition details
Step 7: Review transactions
- Click on Transactions to view all related entries
- Drill into the latest voucher to see the journal entries
- Raw material inventory: Reduced to reflect the item’s removal from inventory
- Fixed assets: Increased to reflect the item’s addition as a fixed asset
- Use the Transaction Origin field to view
- General Ledger (GL) transactions
- Sub-ledger entries for both inventory and fixed assets

Moving an inventory item to Fixed Assets in Finance and Operations
This step-by-step guide walks you through the process of transferring inventory items to fixed assets in Dynamics 365 Finance and Operations, ensuring you can efficiently track depreciation, maintain clear financial records, and stay compliant with reporting standards.
Conclusion
Transferring inventory items to fixed assets in Dynamics 365 Finance and Operations is a critical step for maintaining accurate financial records and effective asset tracking. This process allows you to reclassify items from inventory to fixed assets when they are designated for long-term use within your organization. By doing so, you reduce raw material inventory while increasing your fixed asset value. With D365 Finance and Operations, you benefit from detailed transaction tracking, ensuring transparency, accuracy, and compliance with organizational policies. Properly managing this process not only safeguards data integrity but also supports informed decision-making. Contact us to learn more about how to make the most of D365 Finance and Operations.