Shopify Business Central Connector creates powerful end-to-end retail solution

Microsoft and Shopify have partnered together to create a connector between popular ERP Dynamics 365 Business Central and e-commerce giant Shopify. This new connector is included in the latest release of Business Central and is available out-of-the-box for no additional cost. This integration combines the power of Business Central’s inventory management, procurement, and fulfillment capabilities with Shopify’s easy-to-use eCommerce and POS functionality which creates a compelling end-to-end solution. This article covers the features of the connector and the steps to set it up.
Shopify Connector features
The Business Central Shopify Connector includes the following features:
- Support of multiple Shopify stores
- Bidirectional synchronization of customers
- Bidirectional synchronization of items/products
- Synchronization of inventory levels from Business Central to Shopify
- Import of Orders from Shopify to Business Central
- Import of Fulfillment Information from Business Central to Shopify
Business Central Shopify Connector benefits
Business Central is a robust yet affordable ERP for small to mid-size businesses. However, up until now, there was no easy way to integrate Business Central with an eCommerce platform or Point of Sale (POS) system without custom integrations or third-party add-ons. The new Shopify Connector opens the door to a complete solution for companies needing a strong ERP and eCommerce and POS functionality.
By connecting Business Central and Shopify you can achieve the following benefits:
- Strong inventory management that is not available in Shopify
- Robust procurement not available in Shopify
- Ease of reconciliation of inventory since eCommerce/POS is integrated with ERP
- Automatic creation of accounting entries
- More reporting options
Shopify setup
In order to use the Shopify Connector for Business Central, you first need a Shopify account. If you do not already have an account, you can sign up for a free 14-day trial here. There is no credit card required and it is easy to set up.
There is no set up or configuration that needs to be done in Shopify specific to the Business Central connector, all set up for the integration is done in Business Central.
Business Central setup
The Shopify Connector is installed by default in Business Central if you have the Business Central 2022 Wave 1 update applied.
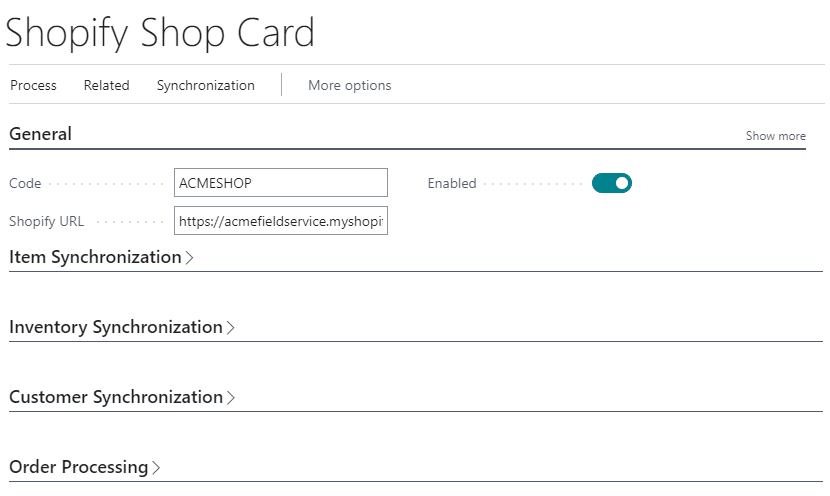
From the Business Manager Role Center, you will see a Shopify option in the menu. To set up your Shopify account for the first time:
- Navigate to Shopify >> Shops
- Click New to create a new Shop. Note you can have multiple Shopify shops connected to Business Central
- Enter the following:
- Code – this should be a unique identifier for the shop
- Shopify URL – this can be copied and pasted from your Shopify account or demo
Toggle the Enabled option to turn on the integration. When you Enable the integration it will prompt you for your Shopify login and password and permission to install the Business Central Connector App in Shopify.
You must also make sure that Business Central has an access token for Shopify. This can be done from the Shopify Shop Card by clicking on Process >> Request Access.
On the Shopify Shop Card, there are set up options for Item Synchronization, Inventory Synchronization, Customer Synchronization, and Order Processing. We will discuss these setup options below.
Item Synchronization setup
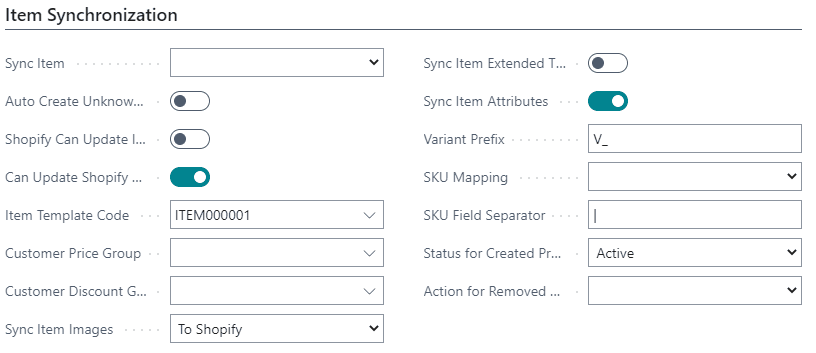
Items in Business Central correspond to products in Shopify. The Business Central Shopify Connector features bidirectional synchronization of items/products. This synchronization can be configured based on your business needs on the Item Synchronization tab of the Shopify Shop Card.
The default behavior for the bidirectional synchronization is the following:
- Users choose which Items to synchronize from Business Central to Shopify, by adding items to the Shopify Product page
- Products are imported from Shopify to Business Central together with orders, if the product does not already exist in Business Central it will be created
This is the default behavior that occurs when the Sync Item field on the Shopify Shop Card is left blank. There are two other options available:
- To Shopify – This option is used if you want to manually update products from Business Central to Shopify
- From Shopify – This option is typically used in a data migration scenario where you want to import items in bulk from Shopify
You can also choose whether the integration is allowed to update Shopify Products and whether it is allowed to update Business Central Items. Additionally, you can configure the integration based on if you want to include images, extended text, and item attributes in the synchronization and how to handle variants. An Item Template can be used to set default settings for items that synchronize from Shopify to Business Central.
In this walk-through, we left Synch Item blank which uses the default options, plus enabled Can Update Shopify Products and chose to synch images and Item Attributes from Business Central to Shopify.
Before synchronizing Items/Products we must complete the setups on the Inventory Synchronization and Customer Synchronization tabs of the Shopify Shop Card.
Inventory Synchronization setup
If you wish to track the quantity on hand for your inventory, you must turn on Inventory Tracking in the Inventory Synchronization tab of the Shopify Shop Card.
- Go to Shopify Shop
- Open the Shop
- Toggle Inventory Tracked to be on
You also should set the Default Inventory Policy. By default, the default policy is Continue which allows inventory to be sold to the negative. If you want to disallow selling negative inventory, select Deny. If you have a brick-and-mortar store it is recommended to set the policy to Continue because if the item is physically present it can be sold. If selling through eCommerce and you have unique items that cannot be restocked or items with a long lead time, it is recommended to select Deny.
Next, you need to specify which locations within Business Central you want the quantity to show as available for sale.
On the Shopify Shop Card:
- Click Related >> Locations
- In the Location Filter field, add Locations you want Shopify to show as available for sale
- Uncheck the Disabled check box
In this walk-through, we are only synchronizing the inventory from the MAIN location with Shopify.
Customer Synchronization setup
You will need to decide if you want the individual Shopify customers synchronized into Business Central or if you want to use a default customer for all Shopify transactions. If you sell through multiple channels and want to include the sales history of Shopify with your other channels or if you want to use customer reporting out of Business Central, it is recommended to synchronize the Shopify customers into Business Central. If you do not want customer-level detail from Shopify in Business Central, you can create a default Shopify Customer and all Shopify sales will be attributed to that customer.
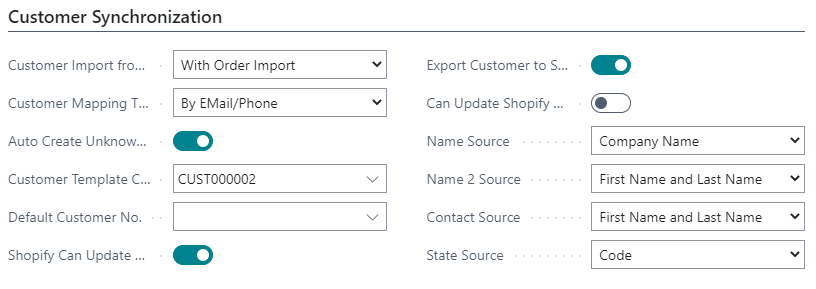
If you choose to synchronize customers, you can also determine which direction you want the synchronization to occur. The default behavior is for the customer to be imported from Shopify to Business Central with the order; however, it is also possible to do a synch of all customers either from Business Central to Shopify or vice versa.
When an order is placed, the customer information is imported along with the order from Shopify into Business Central. You can choose if you want the customers mapped based on e-mail and phone number or bill-to information. Additionally, you can choose if you want a customer created for a customer that comes over and cannot be mapped, and if so, you can choose a default customer template.
In this walk-through, on the Customer Synchronization tab of the Shopify Shop Card, we have the default option selected of customers being imported with the order and we want the customer level detail in Business Central so we do not have a Default Customer No. and we have a template created for creating any new customers. We have chosen to map customers based first on email and then by phone number.
Initial Item / Product Synchronization
In this walk-through we are doing an initial synchronization of items from Business Central to Shopify, which can be done by following these steps:
- Go to Shopify >> Products
- Click >> Add Items
- On the Shopify Add Item to Shopify page, enter the following information:
- Enter the Shop Code
- Enter filters as needed, for example, if you only want to include certain Item Categories
- Click OK
This will list all the products that will be synchronized to Business Central.
Next, we need to send the list of products to Shopify. You can do this on the Shopify Shop Card by clicking Synchronization >> Synch Products.
This will start a Job Queue, which is Business Central’s task scheduler. This process will take a few seconds to a few minutes depending on the volume of products.
If you would also like product images to be synchronized you can do this on the Shopify Shop Card by clicking Synchronization >> Synch Product Images.
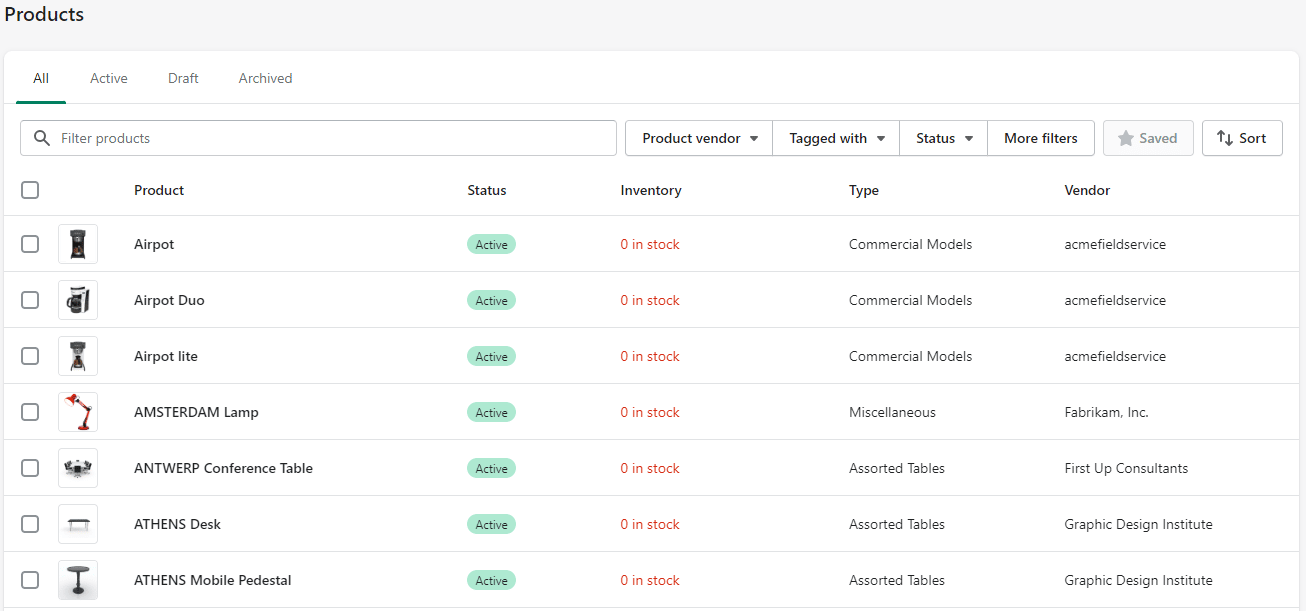
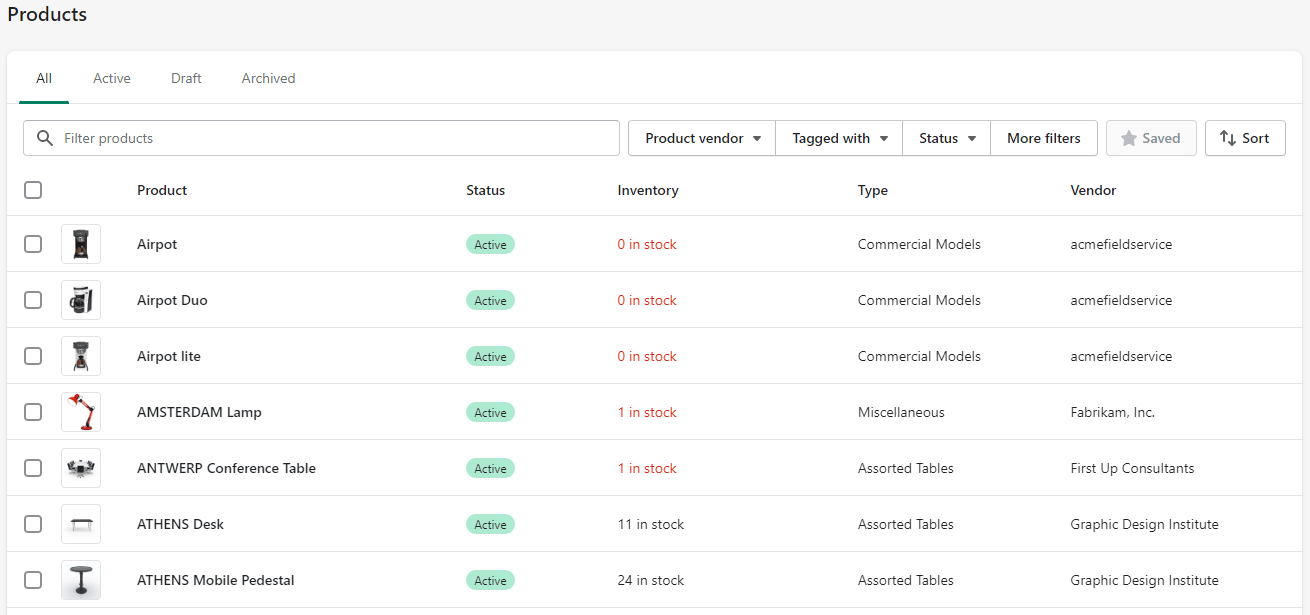
Once these two synchronization processes are complete, there will be a list of products in Shopify, complete with images, that match the Items in Business Central.
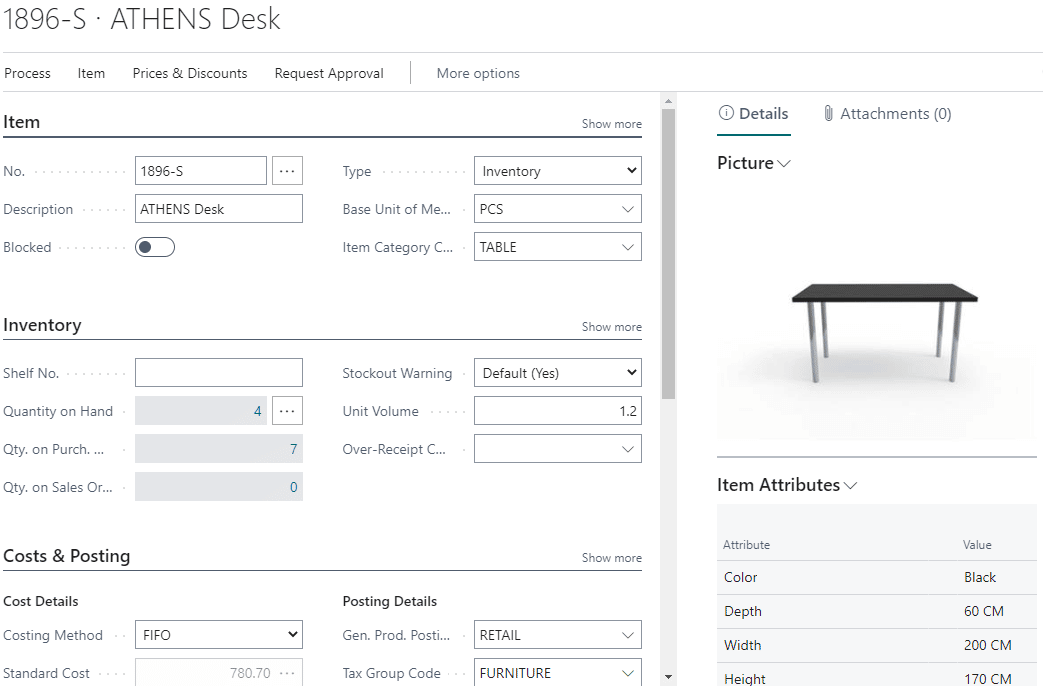
Note that the default sort order in the two systems is different, which makes the list look different but it is the same list of items. By default, Business Central sorts by Item No. and Shopify by Product Name. You can see that both lists contain the ATHENS Desk if you expand ATHENS Desk to see the details, the Business Central version can be seen on the left and the Shopify version on the right.
Initial Inventory Quantity Synchronization
At this point, items and item images have been synchronized to Shopify but all items in Shopify are listed as having 0 in stock.
To load the inventory quantities from Business Central into Shopify go to the Shopify Shop Card and click Synchronization >> Synch Inventory.
Once this synchronization completes, the inventory quantities will be listed in Shopify.
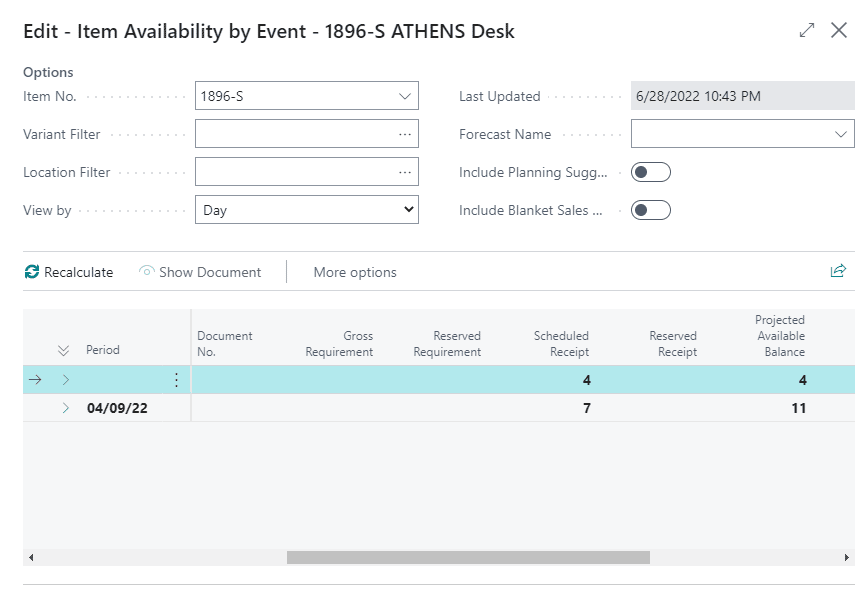
The quantity value that is synchronized to Shopify is the Projected Available Balance in Business Central. This value can be found in Business Central on the Item card by navigating to Related >> Availability >> Item Availability by Event. Projected Available Balance adjusts quantity on hand by known quantities that are on open documents such as Purchase Orders, Production Orders, and Sales Orders.
Order Processing setup
The last setup that we need to complete on the Shopify Shop Card in Business Central is on the Order Processing tab.
Sales in Shopify can have additional charges such as Shipping Charges and Tips. If those charges apply, you should specify which G/L Account those amounts should be booked to. Additionally, Shopify offers the ability to sell gift cards, if you will sell gift cards from Shopify specify which G/L Account to use.
There is also the ability to automatically create orders in Business Central from Shopify and to include the Shopify Order on the Sales Order. Additionally, you can choose if taxes should be calculated based on the ship-to, sell-to, or bill-to addresses.
In this walk-through, we have selected Shopify Orders to be automatically created in Business Central and for the Shopify Order No. to be on the Business Central order.
Lastly, we need to set up mappings for both Shipment Methods and Payment Methods. These mappings will translate shipment and payment methods in Shopify to the appropriate value in Business Central.
From the Shopify Shop Card in Business Central:
- Click Related >> Shipment Method Mapping
- Select an appropriate Shipment Method Code for each shipment code from Shopify
- Click OK
- Click Related >> Payment Method Mapping
- Select a Payment Method Code for each Gateway
- Optionally add a Credit Card Company and Priority
- Click OK
In order for orders to be imported into Business Central, they must not be archived in Shopify. The default behavior in Shopify is to automatically archive orders once they are completed. If you want completed orders to be imported into Business Central, you must make a change within Shopify in Shopify admin under Checkout >> Order Processing to deactivate Automatically archive the order.
Sales in Shopify
Now that we have Products and inventory levels in Shopify and have completed our setup and configuration, we are ready to make sales in Shopify, either through Shopify eCommerce or POS.
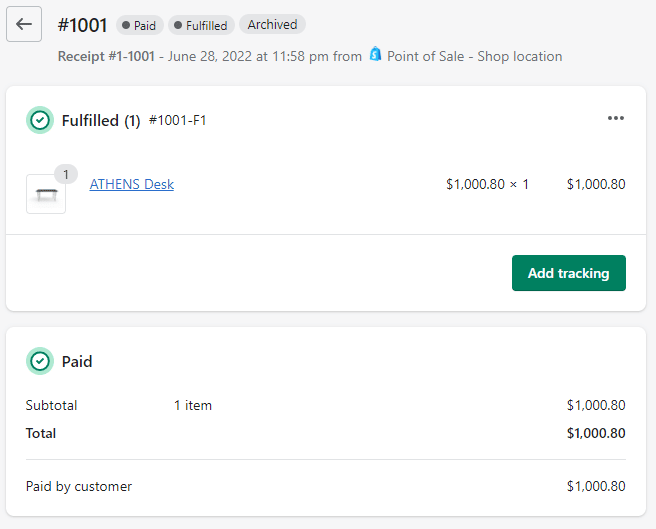
In this example, we sold one ATHENS Desk through Shopify POS.
To import Orders into Business Central:
- Open the Shopify Shop Card
- Click Related >> Orders
- Click Process >> Sync Orders From Shopify
- Enter any filters to restrict which orders you want to import. Filters include Fully Paid, Risk Level, Financial Status, Fulfillment Status, Confirmed, Import Action, and Attribute Key Filter
- Click OK
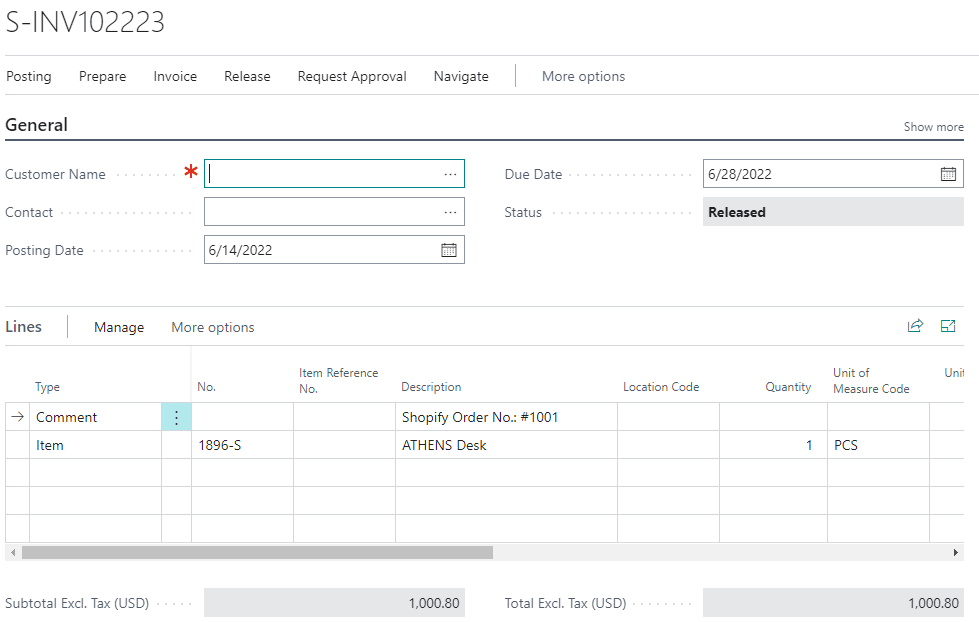
This process will pull in all Shopify orders and put them in the Shopify Orders list so that they can be reviewed before creating Sales Documents in Business Central. If the order has been completely fulfilled in Shopify, for example, if it was a sale at a brick-and-mortar store, a Sales Invoice will be created in Business Central. If fulfillment has not occurred, it will create a Sales Order in Business Central so that the item can be fulfilled.
To create the Sales Document in Business Central from the Shopify Orders page:
- Click Process >> Create Sales Documents
- Click Yes
In this example, the Shopify Order was already completely fulfilled so it created a Sales Invoice in Business Central.
Once the Sales Invoice or Sales Order is created in Business Central, standard Business Central functionality can be used to post the transactions and the proper general ledger and sub-ledger accounts will be updated.
If a Sales Order is created and fulfillment is done within Business Central, the tracking information can be integrated back into Shopify.
Automating Business Central and Shopify Connector
In this walk-through, we manually synchronized Business Central and Shopify to illustrate the different integration points. However, in a production deployment, it is recommended to automate the synchronization using standard Business Central Job Queue functionality. The following automation can be established:
- Synchronization of Items/Products
- Synchronization of Customers
- Synchronization of Inventory Levels
- Import of Shopify Orders into Business Central
- Creation of Sales Orders and Sales Invoices in Business Central
- Import of Shipping Tracking information into Shopify
Next steps
We hope you are as excited as we are about the new Business Central Shopify Connector and how it can empower your retail business.
For assistance with the Business Central Shopify Connector, or with Dynamics 365 Business Central in general, contact our team of software experts. We are a certified Gold Microsoft Partner with over 20 years of experience helping clients with their ERP needs.
